Throne Rush Hack Trainer \ credits Anthony's Toolbox -Infinite HP
THIS IS THRONE RUSH HACK INFINITE HP
VIDEO TUTORIAL:
.https://www.youtube.com/watch?v=EP9JVqBknKs
virus total
https://www.virustotal.com/pt/url/01...is/1400937666/SUPPORThttps://www.facebook.com/FaceCheatsBrasil.orgPAGE Anthony's Toolboxhttp://anthonys-toolbox.org/Download Trainer (UPDATE) 25/05/2014Throne Rush Infinite HP. 24.05.2014
Power Full Human Dictionary For Dictionary Attack Free Download

And I convert it to 23 parts every parts is take about 1 hours attack depend on your computer speed Is Best For Those User Who has no Laptop And facing the Load shedding Problems If any problem then comments..
also follow me on twitter write in your message
follow H_4_hacker
and send to 40404 and receive my updates on your mobiles totally free
How To Use:
Open Part 1 Extract Part 2 automatically extract And Then use and enjoy
Part 1

Part 2

STEPS :-
1) Open the id which u
want to create single name.
2) Now go to UC BROWSER
SETTINGS>NETWORK>POR T.
3) Enable the Port Option.
4) Now put this
219.83.100.195 : 8080 in the port.
5) now in down there will
be a box for inserting
DOMAIN.6) Insert m.facebook.com
in domain box n then SAVE the
whole settings. 7) now
go back to ur fb id. fb will
now run slowly.! go to acc.
settings. 9) Change
Language To BAHASA
INDONESIA. 10) Now Go to Name
change, remove the last
name& SAVE it.! 11) Its
DONE NOW! U will have urFirst name only.! 12) Aftr all
these, remove the proxy n change
the laguage back to
English(US)
OUR PAGE
https://www.facebook.com/HACKAUTOLIKER
Reliance free internet trick
Reliance free internet trick

many states. This trick will
make your speed like
rocket. This trick is tried
by many users and they felt
a very high speed
experience. Its actual 3g
speed will make you feel
sitting on rocket.
Requirment=>
Small 3g Internet pack
required.
APN- smartwap OR rcomwap
How to use Hispeed trick..
Speed Up to 1 Mbps during
night hours and 600 Kbps
during day time.
Its a direct proxy trick so
you can use this for unlimited
usage.
1. Open Mozilla Firefox,
go to options.
2. Then go to Advance Tab.
3. Then click on Network tab
and choose manual proxy
setting.
4. In proxy add following-
vod.rcom.co.in
5. In port add 80.
Now Configure the same
setting in IDM for better
speed in downloads.
That's it now enjoy this high
speed trick and share this
post with your friends to
encourage us to post more
tricks.
BSNL DNS Premium Free internet Trick
BSNL DNS Premium Free internet Trick
know this trick working many states and
Personally checked in UP E/W & Delhi sim,
so I Pretty sure is work rest of state too.
These all trick will work via apn-
blackberry.net
Well first you have activate bsnl bbm plan
on your sim because this Premium DNS
trick working on it.
Note- you should have 128k bsnl 3g sim
(recommend)
but you could also try with any bsnl sim in
which 3g is activated.
Mainly we sugest you two bbm plans
1 . 7 days 97 rs bbm plan (first try this &
before activation once reconfirm plan
according to your state )
2. 30 days 303 rs bbm plan
You could activate these plans by going to
retailer shops , as there is no way to
activate bb plans using msgs. You could
also recharge bb packs via going to bsnl
official online recharge through net
banking or debit/credits cards. or sites like
paytm.com
NOTE: These BBM packs is every state is
different so please confirm first which
price you activate same plan then recharge
it.
Now once bbm pack is activated on your
Sim try to connect with apn- blackberry.net
Primary DNS
8.8.8.8
Secondary DNS
8.8.4.4
Now save it and set it to default.
Now Try to connect 4-5 times until it get
connected.
Now when connected its means now your
bbm plan is activated.
AND YOU ARE READY TO SURF NET Without
any vpn with normally 3G speed.
Facebook Photo Verification Trick 2014
Facebook Photo Verification Trick 2014
Sometimes Facebook community block your id for some invalid activities then you got a option of Photo Verification to login your account. Its not easy to remember all photos information about your friends. So here is a latest Trick of 2014 to Verify Photos on Facebook. Just follow this Simple steps.
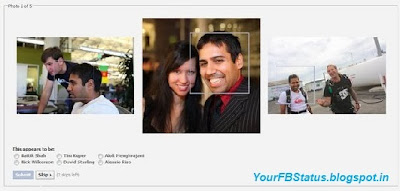
Step 1 - Go to Google images search
Step 2 - Type Facebook "name of 1st friend" copy and paste from blocked account
Step 3 - Search , you will see the picture of the 1st friend in the 1st 3 results
Step 4 - If you didn't identify the picture, repeat the same
Step 5 - If you didn't identify the friend.simply skip the picture and you will get another one (always you have 2 skips/picture)
Step 6 - After you identify the 5 pictures Facebook will ask you to change your password and email password
Step 7 - Change your Facebook account password and confirm that you change your email password (even you don't)
Step 8 - Now every thing is OK.!!
Get Rid of Photo Verification on Facebook
Get Rid of Photo Verification on Facebook


Facebook has their own security standard.
Sometimes it block your id for some invalid activity then you got a option of Photo
Verification to login your own account.
And it's not easy to get rid of photo verification.
So today here we are going to tell you how to Get Rid of Photo Verification on Facebook.
After following this simple Steps you can secure your Facebook Account.
After doing all this steps your id will never get block and no photo
verification will be there so be happy and proceed further.
( NOTE : It work with latest account)
Step 1 - First you must log in to Facebook Account.
Step 2 - Now Click Setting sign and scroll down.
Step 3 - Simply Click on account setting.
Step 4 - Now join a Network and add school or college full name.
Step 5 - Fill all the Information necessary.
Step 6 - After Complete the above steps Facebook will never ask you to photo Verification.
Now your account is Safe and never get banned from Facebook.
Enjoy Friends !!
Don't forget to share it with others also.
If you have any question feel free to ask me just Drop your Precious comments below.
Keep Your Page clean From Advertisements, and save data
Keep Your Page clean From Advertisements, and save data
Do the add's on your page irritates you?? You can Block all these add's on your page by Downloading the extensions, on Google Chrome.

HOW TO DISABLE/ENABLE USB PORTS ON COMPUTER.

HOW TO DISABLE/ENABLE USB PORTS ON COMPUTER.
Disabling of USB ports on a Computer is an extremely easy task which can be done through the Registry.(if you have access to it.)
So,here in this tutorial,I'll be guiding you on steps to take in order to disable it on your system.
How To Disable Access To Usb Ports On A Computer.
Click on �Start� and navigate to �Run�[you can use the search] or by simply clicking the Windows button + R.
Type �regedit� in the text box and hit �Enter�.
Now,navigate to HKEY_LOCAL_MACHINE\SYSTEM\
Click on UsbStor and at the right-panel,double click �START�
Now,in the Value Data box, set the hexadecimal value to 4 and finally click on �OK� and exit the Registry editor.
That's all for disabling USB ports.
Now,if you would like to re-enable an already disabled port,just:
Follow the instructions above and on getting to the Value Data box, replace 4 with 3..and thats all
have control on your pc...protect it from unwanted virus
Hide information behind the pic
Hide information behind the pic.

1. take the image...in which you want to hide the info.
ex: Manjot.jpg
2. take any file that u want to hide in the image Manjot.jpg
3.select both the file and compress it with winrar and try to do it in the location desktop so its easy for you to do the process and you will get desktop.rar file in desktop
4. open command prompt
5.type {cd desktop} without brackets to create directory desktop.
it will show some what like
c:\users\your pc name\desktop>
6.now type the following commands in the desktop
copy/b Manjot.jpg(its my image name)+desktop.rar(it contains both image and data on desktop u have just created) MJ.jpg(file name in which u want the resultant image file containing ur hidden data)
ex:c:\users\your pc name\desktop>copy/b Manjot.jpg+desktop.rar Mj.jpg
7. now you can see the resultant image in your desktop if you want to see the file contained in the image extract it using winrar.
OPEN BLOCKED WEBSITES
OPEN BLOCKED WEBSITES

#share it if you havn't share it....and start accessing blocked website such as #facebook, #youtube in school and colleges
Nowadays many schools and colleges are Providing internet access in their campus, but with a restriction.They are Blocking many popular sites like Facebook, twitter, etc.So in this article I would like to discuss the way to access Blocked Websites.
1.Using IP address instead of Web Site URL
Most of the software which block the sites in our PC uses Website address/URL only like i.e. www.Facebook.com, www.twitter.com, etc.So can access those sites with their IP address instead of URL.Every website has its unique IP address same as the Computer and mobile devices.To get IP address of a website Simply Run Command Prompt and type:-
Type Command: ping domain.com
Type this command in Command Prompt and replace "doamin.com" with the site URL of which you want to get IP address.
For Ex: ping google.com
IP address of google -->74.125.236.142/
You will see one IP address many times its your web site Address just note down it and run it on your browser.
2.Using VPN is the best way to access blocked ways.VPN software allows you to browse anonymously, just download it and install on you PC.This Software is available in both paid and free version.Here i have listed some best VPN software.
1.ProxyXPN VPN
2.Hotspot Shield VPN
3.Tunnel Bear VPN
Creating Bootable Pen Drive Using Windows Command Prompt
Creating Bootable Pen Drive Using Windows Command Prompt
Making a pen drive bootable is possible in Windows7 & Windows8 operating system. Formatting a computer to install fresh Windows OS with a CD/DVD drive is not very good because it takes too much time to install fresh Windows operating system. There can also be a problem for many people that CD/DVD drive doesn�t work properly. So this can be a problem for them. Today laptop or desktop comes many USB ports. So there is no need of CD/DVD drive to format a system. Formatting is very fast and easy with flash drive/pen drive and also no software is required for this method. Windows7 or Windows8 command prompt can do the work with few lines of command. Just follow this tutorial.
Start your command prompt.
For windows7 users:
Go to �Start� button and click. Write �cmd� then cmd icon will appear on the top of the panel. (Fig.1)

Fig.1-Starting Windows CMD
�Right click� on the cmd icon and click �Run as administrator�. (Fig.2)

Fig.2-Running Command Prompt As Administrative
It will open the command prompt. (Fig.3)

Fig.3-Windows 7 CMD Window Pops Up
For windows 8 users:
Press �Windows key� and press �c�. You will see the command prompt icon. �Right click� on the command prompt icon and click �Run as administrator� from the bottom bar. (Fig.4)

Fig.4-Windows 8 CMD Window Pops Up
It will open the command prompt like in Fig.3
Now following steps are same for the windows7 and 8 OS.
Type �diskpart� inside the command prompt and hit �ENTER�. (Fig.5)

Fig.5-Type diskpart And Enter
It will good before going to next step that you should disconnect all other external hard disk, flash/pen drive etc. because accidently these drive can be formatted. So taking precaution is good. Only one pen drive with minimum 4 GB should be connected. Save all the data from the pen drive because it will be formatted in one of the following step.
After last step type �list disk� inside the command prompt and hit �ENTER�. (Fig.6)

Fig.6-Type list Disk And Enter
This will show all disk connected to the system like DISK 0, Disk 1, and so on with �Status�, �Size� , �Free� etc.. We can recognize the pen drive with size. Disk 0 will be the system disk in which the windows OS is installed. In this tutorial Disk 1 is the pen drive (3855MB=4GB). This pen drive is going to be a bootable pen drive.
Type �select disk 1� inside the command prompt and hit �ENTER�. It will select the disk 1 (pen drive) for all coming steps. (Fig.7)

Fig.7-Type select Disk 1 And Enter
Type �clean� and hit �ENTER�. It will erase all the data from the pen drive. (Fig.8)

Fig.8-Type clean And Enter
Type �create partition primary� and hit �ENTER�. It will create a primary partition in pen drive. (Fig.9)

Fig.9-Type create partition primary And Enter
Type �select partition 1� and hit �ENTER�. It will select the partition created in the last step. (Fig.10)

Fig.10-Type select partition 1 And Enter
Type �format=fs ntfs quick� and hit �ENTER�. It will format the pen drive quickly with NTFS file type. (Fig.11)

Fig.11-Type format=fs quick And Enter
Type �active� and hit �ENTER�. It will make partition as active for booting after restarting the computer. If this is step is missed then computer will not boot from the pen drive. (Fig.12)

Fig.12-Type active And Enter
Type �exit � and hit �ENTER� to close the diskpart and close the command prompt window. (Fig.13)

Fig.13-Type exit And Enter
Now the pen drive has become bootable. Now all the files from root of Windows operating system setup DVD or ISO has to copy inside the pen drive root.
So open the Windows setup file from DVD or ISO and copy all file by selecting with �Ctrl+A� and paste it inside the pen drive�s root folder as shown in the figure. (Fig.14)

Fig.14-Copying All Files And Pasting It
After complete copy, the pen drive will be a bootable for Windows 7 and Windows 8 OS completely. You just need to�Restart� your computer. �Restart� your computer. When BIOS screen appears then press �F12� key. It will show the options to boot from CD/DVD drive, hard disk and pen drive. Just scroll down to pen drive and hit �Enter�. Your system will boot from pen drive. Now you can install windows OS.
Subscribe to:
Posts (Atom)